Creating and saving the project
In this post, we'll set up a project for our screencast and configure the central repository for storing all project resources.
PREVIOUS POST < || > NEXT POST
Before starting to edit your screencast, you need to create a new project and add the screencast to it. Projects in Camtasia are used to work with resources. The main project resources include:
-
Video recorded from the monitor screen and/or webcam, as well as system sounds or audio recorded from the microphone. These resources are stored in a file with the .trec extension (trec stands for TechSmith Recordings).
-
Images (jpeg, png, gif, and so on). As a rule, images in projects are used to create various visual effects.
-
Audio (mp3, wav, etc). Audio files can, for example, contain background music or voice-over narration recorded in a third-party program.
You can create a project separately from the video - that is, an empty project - and then add the desired video and audio files or images to it. In our case, the screencast was automatically opened in the Camtasia editor and a new project was created for it. Now we need to save it.
-
Choose Save from the File menu.
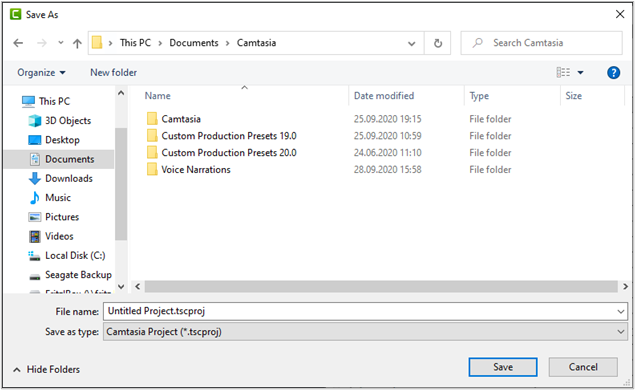
- A window opens where you can specify the folder for storing your project. By default, the Documents\Camtasia folder is suggested. Let's save the project in the default folder for now.
-
Enter a project name in the File name field (for example, ms-edge-tutorial).
-
Click the Save button.
- The project is saved in the specified location with the .camproj extension (in our case ms-edge-tutorial.camproj).
Configuring the central repository for the project
When you add video, audio, and other resource files to a project, they are not copied to the project folder, but only linked to the project. Thus, if you delete the source files or move them to another location, they will no longer be available within the project.
For more comfortable work, we'll create a special folder for our project - MS-Edge-Tutorial - and move our project file and the recorded screencast into it. To do this:
-
If the project is open in Camtasia, close the program.
-
Create a subfolder named MS-Edge-Tutorial in the Documents\Camtasia directory.
-
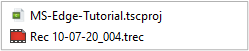
Move the recorded screencast to the MS-Edge-Tutorial subfolder. This file is located in the Documents\Camtasia folder and has the name of Rec-MM-DD-YY.trec.
-
Move the project file to the MS-Edge-Tutorial subfolder. Now your subfolder should contain two files.
-
Double-click the project file.
- The project containing our screencast is opened in Camtasia.
As a rule, Camtasia automatically finds the screencast if it is located in the same folder as the project file. If for some reason the screencast can't be found, a window is shown where you can select the new file location.
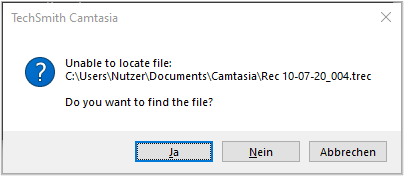
Click the Yes button, then go to the MS-Edge-Tutorial subfolder in the window that opens and choose your screencast.
PREVIOUS POST < || > NEXT POST